Saturday, 14 December 2013

Decorated Initial 'S' - My first altered letter.

I have had a great time decorating this MDF letter S.

The MDF was covered with gesso to start with, then I used a flower stencil and some stencil paste to give the center part some texture. I then painted over the whole letter and after this was dry I added highlights with Inka-Gold and the colour I used was 'Gold'. This made the stenciling stand out and gave a nice texture and highlight to the edges of the letter. You can see the shine in the picture below.


I have used some clay items that I made using moulds I have. I used a head that I had made with terracotta air dry clay, and rubbed over Inka-Gold. I did the same with a clock face. The two swirls were made with white paper clay which is very light weight and these I coloured gold. I also added a clay key that had been painted bronze, but I rubbed over Inka-Gold again.


All around the edge, I glued a lovely lace trim.


I added the Tim Holtz dangle from the top, and I had a metal pendant frame, that I added a picture to. Before adding glossy accents to the picture I added micro beads around the edge for some interest. Also the metal pendant was silver coloured and I got out the Inka-Gold again so that it matched in with the other embellishments.

The flowers were either wild orchid crafts, prima, or other flowers from my stash.


My first altered letter, and I had a lot of fun.


Envelope Punch board - another card box

These boxes made with the envelope punch board make great gifts, fill them with cards, or even a wrapped piece of jewellery would be great.


A Band decorated band around the box makes a great closure, then the box is re-usable. You can get in and out of the box much easier. Below are some of the cards I made to go inside the box. All the goodies for this were Stampin Up and can be found on my site.  www.craftingshaz.stampinup.net


Sunday, 8 December 2013

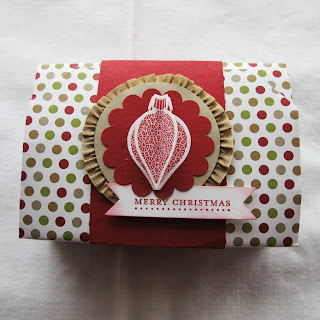
Gift box for gift card or cash using - Envelope punch board

This is a much more decorative way to give gift cards at Christmas time or any other time through the year. They even look good with cash folded up. Looks more like a gift that a card in an envelope. The draw is made with one 6x6 piece of paper, using the envelope punch board, and then you just fold round paper for the draw to push into. The draw has a little notch taken from the top so the draw can be pulled out easily, this was made using the punch board as well. These are made with the Stampin Up punch board and design papers. Also decorated using punches and ornament stamps and dies. Visit my web shop for stampin up here.


These were made from a tutorial by livelovescrap on you tube

Sunday, 17 November 2013

Decorated Paper Bag for Gifts

I have been using mt Stampin Up products to decorate a plain white paper bag. This is going to be used to hold a few small birthday presents for my niece. The bag measures approx 8.5"x 10"x 4". I bought a batch of them so they are only a few pence each, but when they are decorated they look lovely and it is a fun project to complete. I think I will have to make some for Christmas as well.


You can buy all item require for this through me. :)

Sunday, 3 November 2013

The Envelope Punch Board - Time to play

It's has arrived and available to purchase from Stampin' Up here. You will also find a video so that you can see the board in action.


As you will have seen if you have checked out the video, and the picture above, you can custom make loads of different sized envelopes in any paper or card that you choose. I had a quick go at making some small ATC, and gift card envelopes, and they were so cute, but alas I did not take a picture! I do have this spotty one made for a 5.5"x4" card (by the way you do get a sheet to change the table to metric).


Not only can you make envelopes you can also make Boxes that you can store between 4 and 6 cards and envelops that you can use as gifts. This one was made from a tutorial from Kelly Gettelfinger. Purchase your board and get making them for Christmas presents, they are such fun, and you can put a variety of cards in the box, the flatter the card the more you will fit in.


A nice band around the box that slips off is a great way to seal the box so that you do not have to buy magnets or velcro.


Items used for just the box are:-

The Envelope Punch Board.
Card stock - Tangerine Tango.
Epic Day This and That Papers.
Secret Garden Stamp set and die set for stamping and cutting the flower and leaf.
Bitty Butterfly Punch
Rhinestone Basic Jewels

Sunday, 27 October 2013

Fabric Christmas Tree

I have dusted off the sewing machine and used some of the Christmas fabric I have been hoarding. I need some bells for the end of the branches really but at the moment I can't find the ones I have.
This is the small tree, I have a larger one to make but the fabrics I have are all too small for this one, so that may mean I have to go shopping again, what a chore!


Monday, 14 October 2013

ATC set of 4 to swap

I have 4 ATC cards up for swap, made these after I had completed some birthday cards and gifts.


Belated Birthday Card.


This is a belated birthday card, life got in the way or my mind just stopped (more likely to be the latter). So I got out my lovely dress form die from Stampin Up and used some of last years papers to make this card and get it in the post as soon as I could.

Announcement to make

I am pleased and thrilled that I have joined the Stampin Up family and am able to help and supply the lovely goodies available from Stampin Up.

You don't have to purchase from Stampin Up parties and workshops alone, you can order directly from my site here and have a lovely parcel delivered directly to your door. If you spend over £150 you also earn Stampin rewards. Find a friend who would also like to purchase and you could split the order and share the rewards.

If you wanted to join the family as well, I can also sign you up, contact me for any details or check out on my site for details.

I hope I can find some Stampin Up friends along the way.

Sharon xx

Saturday, 28 September 2013

Lace Box Photos

I now have some still photos of the lace box.


Thursday, 26 September 2013

Birthday Card - Dress form

I have made a birthday card using Stampin up products. I love this dress form and can see other dress colours may have to be made!


Lace Box

I have made a lovely lace box to keep my laces in, so the are clean, tidy and tangle free! I used a cereal box, covred it with Stampin up papers and decorated with lace and trims. I have three more boxes to decorate so watch this space!


Sunday, 22 September 2013

Decorated Christmas box and tags

After my crafting weekend I had papers left over and some boxes that I had not decorated, so I thought I would complete one of them and also make some tags. All items use Stampin up items.


I completed a video to show you around the box and tags.


Scrapbook pages from craft retreat

On our last day we also completed some scrapbook pages relating to Christmas. I took some photos from 2011, as I had only take two photos in 2012, not sue why.


This one I completed at home with some of the papers from the course. I wanted it simple as I liked the papers and ribbon.


Below are the links to the videos of the retreat crafted projects.


This was the memory album I made showing pictures from the weekend.


Thursday, 19 September 2013

Craft retreat project 5 - Days 'til Christmas Tin.

The last day it was Christmas and we were all supplied with a Santa hat! This project was a metal tin which we decorated and inside held the numbers that you place on the chalk board on the front to count down Christmas. It was fun fun Christmas fun!


Wednesday, 18 September 2013

Craft retreat - Project 3 - picture

This project we received a lovely box frame to make a 3d flower picture. We had all the papers and the frame in our goody bag. I love flowers so really enjoyed this project.

Buy these papers here.


Craft retreat project 2

This project is a card/notelet holder. You can store 5 or 6 cards and envelopes in the neat little folder. In our goody pack we got pearls, card, seam binding ribbon, buttons and a large Stampin up stamp to take home with us.


This is the outside of the wallet.


Pocket one side for the cards and one the other for the envelopes. Some decorated the wallet with papers as well. I did the spine but not the other sections.


I completed 5 cards for the inside, all in a different colour and slight differences with the decoration.


Tuesday, 17 September 2013

Paper Haven - Stampin up Craft Weekend Project 1

This was my first crafting weekend, and my first stay in a hotel by myself! It was a fabulous weekend hosted by Julie Kettlewell, all the other ladies were fabulous and we all had a great time. The hotel was very good to us as well, we had breakfast buffet lunch and evening meals included. The buffet lunch surprised us all, it was a cooked meal, the only down side was the price of the wine! It was probably good that I did not have much to drink, last thing I want to be is drunk in charge of some scissors or a heat gun.

The first project on Friday night was a box folded from one piece of 12x12 paper. This was fun and took a while to master, but when I got home I made a few more.


This shows the inside which can contain a small card as shown, but would be good for small pieces of jewelry or crafting embellishments given as gifts.


This is the card inside.


I made this one when I got home using some papers left over from the weekend and my Stampin up stamp and die set for the baubles.


The card inside.


Simple one made with non Stampin up papers and a simple bow.


Another made with papers left from the weekend and some flowers I stamped while I was there.